
I attended a workshop on teaching art at our recent homeschool conference and this has inspored me to write an art program and and then use it to teach my own children for the remainder of this year.
I thought some of you may like to have a go at this program with your own children.
It is a 10 lesson program that has children gradually building up their skills and practicing with different media to complete one acrylic masterpiece.
We use an artist as our focal point looking at their work and influences and trying to replicate their style and subject matter.
This first 10 week course is on Still Life Painting and our focal artist is Jon van Riswick who is a contemporary dutch painter. Examples of his work can be found at...
http://www.josvanriswick.com/
Or do an online search in google images.
Anyway here is the Art program I have written.....
Still Life Painting with Jon van Riswick
LENGTH OF STUDY: 10 Lessons
OBJECTIVE:
We will research and learn about our artist, their works and influences over 10 lessons and then try to imitate and interpret their style in our own way following a set process as outlined below.
ARTIST OVERVIEW:
Our artist this term is Jon van Riswick, a Dutch contemporary painter who specializes in postcard size still life oil paintings featuring fruit and household items. Jon van Riswick’s paintings are in a modern classical style and are done in oil paint. The bulk of his works contain still life with fruit, still life with flowers, vanitas still life, kitchen still life, floral still life and others. In all paintings the process of decay is an important element.
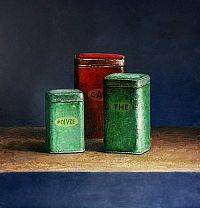
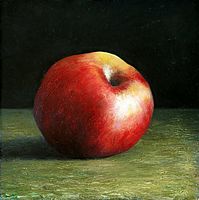
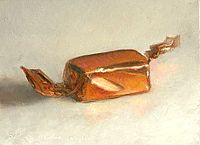
Lesson 1:
Artist Study – Read about and discuss the artist and look at some examples of their work.
Warm Up - Blind Drawing – Using a Still Life display cover the hands and try to draw what you see without looking at your paper or pencil.
50, 30, 20 second Drawing – Set the timer for the appropriate number of seconds then draw what you see as fast as possible using simple line drawing techniques with no shading or detail.
Pencil sketching - Using a 4B pencil try to highlight the light and dark areas on your picture.
Lesson 2:
Artist Study - Look at more examples of the artists work and look at some examples of black and white chalk drawings.
Warm Up - Line drawing - using 4b pencil practice drawing lines with various amounts of pressure aim to show different shade along each line. Do the same thing using black chalk.
Black and White - Using black and White compressed artists chalk draw the still life display trying to highlight light and shade.
Lesson 3:
Artist Study: Look at and discuss some examples of the ink sketching.
Warm Up - 30 second sketching in ink, Using sticks and black ink sketch a still life display.
Ink Sketching - Using the sticks and Indian ink do a more detailed picture highlighting light and shade.
Lesson 4:
Artist Study - - Look at more examples of the artists work and look at some examples of oil pastel drawing.
Warm Up - 30 second drawing with pastel - Set the timer for 20 seconds then draw what you see as fast as possible using s simple line drawing techniques with no shading or detail.
Oil Pastel Drawing - using last weeks drawings as a basis this time draw your picture using coloured oil pastels on black sugar paper. Try to replicate the light and shade shown in the drawing you did last week.
Lesson 5:
Artist Study - Look at more examples of the artists work and look at some examples of coloured chalk drawings.
Warm Up - Set the timer for 30 seconds then draw what you see as fast as possible using simple line drawing techniques with no shading or detail.
Coloured Chalk Drawing - using last weeks black and white drawings as a basis this time draw your picture using coloured artists chalk. Try to replicate the light and shade shown in the black and white drawing you did last week.
Lesson 6:
Artist Study: Look at and discuss some examples of acrylic still life painting, in particular those done by the artist we are studying. Point out and discuss the details, the textures, evident, the shadowed and light areas and the colours used.
Warm Up - Using acrylic paint practice blending primary colours and using colours other than white to show light areas.
Acrylic Painting: On white sugar paper sketch the outline of the painting using pale yellow paint and a thing pointed brush. Highlight where your shadowed areas will be by using more pressure and paint. You will gradually add in other colours over the next 3 lessons.
Lesson 7:
Artist Study: Look at and discuss some examples of acrylic still life painting, in particular those done by the artist we are studying. Point out and discuss the details, the textures, evident, the shadowed and light areas and the colours used.
Warm Up - 30 second painting using acrylic paint. How much detail can you show in 30 seconds.
Acrylic Painting: Add more colour and detail to your painting making sure you remember to highlight the light and shadows from your works in previous lessons.
Lesson 8:
Artist Study: Look at and discuss some finished product paintings, in particular those done by the artist we are studying. Point out and discuss the details, the textures, evident, the shadowed and light areas and the colours used.
Warm Up - Solid 3D shapes - pick a solid shape and using just one coloured pastel, pencil or crayon try to make is appear 3 dimensional. Do this for 3 different shapes, the first for 2 minutes, the 2nd for 5 minutes and the 3rd for 30 seconds. Compare the amount of detail you manage to add in each example.
Acrylic Painting: Finish your painting by adding final colours and details making sure your painting has 3D aspects to it. Today is the last lesson for working on your painting, next week you will start putting together your presentation board.
Lessons 9 and 10:
Compile a presentation board of your work completed during this terms art lessons showing the different steps you went through to get to your finished painting. Your presentation board should start with lesson 1 and move through to your completed painting. At the end of lesson 10 you will be presenting and talking about this to the class.
I hope those of you who are keen to give it a try will enjoy this program. I'd love feed back at the end of it if you can both negative and positive. If it is successful I will write another one with another artist study for next term which for us starts in February.
Blessings
Nina


 Posts
Posts


;)
No comments:
Post a Comment
Note: Only a member of this blog may post a comment.